DockerによるDjango開発環境
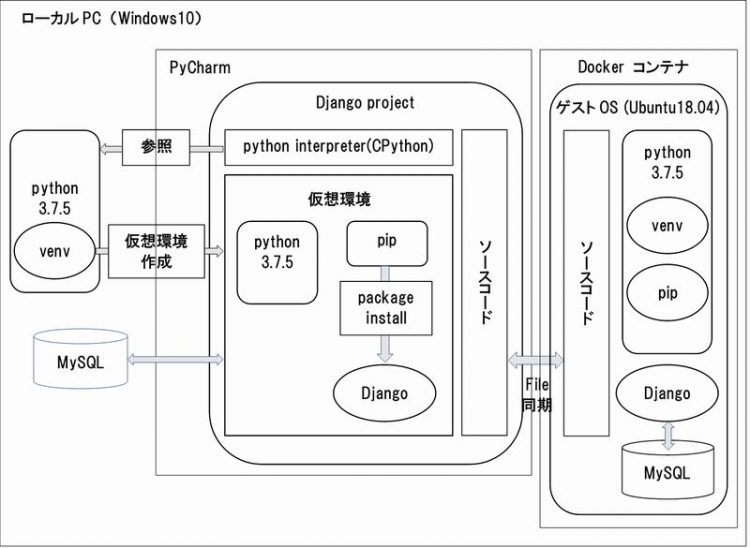
ソースコードの開発は、Windows上のPyCharmで、アプリケーションの動作確認はDockerコンテナ(Ubuntu)のrunserverで実行できる環境を構築します。
全体像は、次のようになります。
 DockerによるDjango実行環境
構築手順:
「Docker Desktop for Windows」をインストール
Docker Desktop for Windowsは、Hyper-V 仮想化を使用します。Windows 10 上で Hyper-V を使用するためには、Windows 10 の Professional 以上のエディションが必要です。
なお、今回インストールしたデバイスの仕様とWindowsの仕様は次の通りです。
プロセッサ Intel(R) COre(TM) i5-5200U CPU @ 2.20GHz 2.20GHz
実装RAM 4.00 GB
システムの種類 64 ビット オペレーティング システム、x64 ベース プロセッサ
エディション Windows 10 Pro
事前準備
Docker Desktop for Windows をインストールする事前準備として、Windows マシンの Hyper-V を有効化しておく必要があります。
また、Docker公式サイトにて、Docker ID というアカウントを取得して必要があります。
Hyper-Vの有効化 にする
Windows ボタンを右クリックし、[アプリと機能] を選択します。
[関連設定] の下にある [プログラムと機能] を選択します。
[Windows の機能の有効化または無効化] を選択します。
[Hyper-V] を選択して、[OK] をクリックします。
有効化するには Windows マシンの再起動が必要です。
Docker IDの取得 する
Docker Desktop をインストールするには、Docker IDというアカウントが必要となります。
事前に、Docker 公式サイトにて、Docker IDのアカウントを取得してください。
次のURLからサインアップしアカウントを作成してください。
https://hub.docker.com/signup
Docker Desktop for Windows のインストール
インストール
インストーラーをダウンロードする
次のサイトで Docker for Windows インストーラーをダウンロードしてインストールします。
https://www.docker.com/products/docker-desktop
[Download Desktop for Mac and Windows] ボタンをクリックします。
次の画面で、 [Download Desktop for Windows] ボタンをクリックして、[Docker Desktop Installer.exe] をダウンロードします。
Windowsマシンへのインストールする
ダウンロードした [Docker Desktop Installer.exe] ファイルを、エクスプローラーから実行してください。
ダウンロードが完了すると、Configraton の画面が出ます。そのまま「OK」を押してください。
[Use Windows containers instead of Linux containers (this can be chananged after installation] の行にはチェックボックスが付いていません。これはコンテナで Windows を動かす場合のオプションです。
今回は Ubuntuを動かしたいのでこのチェックボックスは不要です。
インストールが始まります。しばらく待機してください。
ここまでで Docker Desktop for Windows のインストールは完了です。
動作確認
Docker のバージョンの確認をしてみる
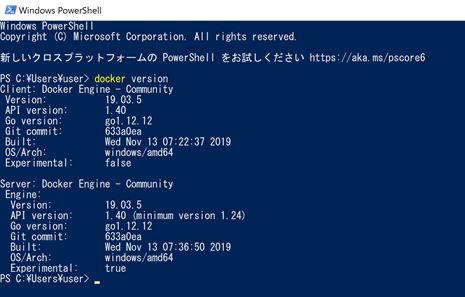
まずは、インストールされた Docker のバージョンを確認してみましょう。
Windows PowerShell を起動して、docker version コマンドでバージョン情報が表示されます。

Hello Worldを動かしてみる
おなじみの hello world を実行します。
docker run コマンドは、イメージからコンテナを起動するコマンドです。
|
|
PS C:¥Users¥user> docker run hello-world |
hello-world というイメージからコンテナを作成して起動するという意味になります。
ただし、ローカルに hello-world イメージがないため、Docker デーモンが hello-world イメージを Docker Hub(Docker社が運営する、インターネット上でイメージを公開・共有したりする Docker Registry サービス)からダウンロードし、イメージからコンテナを起動します。
イメージはファイルシステムとアプリケーションやミドルウェア、実行時に必要とするパラメータから構成されます。
このコンテナは次のような標準出力を出して終了します。
1 2 3 4 5 6 7 8 9 10 11 12 13 14 15 16 17 18 19 20 21 22 23 24 25 26 |
PS C:¥Users¥user> docker run hello-world Unable to find image 'hello-world:latest' locally latest: Pulling from library/hello-world ee446884f7be: Pull complete 8b4475a48151: Pull complete 7c57688e630a: Pull complete Digest: sha256:9572f7cdcee8591948c2963463447a53466950b3fc15a247fcad1917ca215a2f Status: Downloaded newer image for hello-world:latest Hello from Docker! This message shows that your installation appears to be working correctly. To generate this message, Docker took the following steps: 1. The Docker client contacted the Docker daemon. 2. The Docker daemon pulled the "hello-world" image from the Docker Hub. (windows-amd64, nanoserver-1809) 3. The Docker daemon created a new container from that image which runs the executable that produces the output you are currently reading. 4. The Docker daemon streamed that output to the Docker client, which sent it to your terminal. To try something more ambitious, you can run a Windows Server container with: PS C:\> docker run -it mcr.microsoft.com/windows/servercore powershell Share images, automate workflows, and more with a free Docker ID: https://hub.docker.com/ For more examples and ideas, visit: https://docs.docker.com/get-started/ |
これでDockerの動作確認ができました。
Djangoプロジェクトを作成
「PyCharmによるDjango開発環境の構築」の手順で、
\Users\user\PycharmProjects\mysiteにDjangoプロジェクトを作成します。
DockerfileからDockerイメージを作成
次に示すDockerfileをDjangoプロジェクトの直下に作成します。
ファイル名は、拡張子なしの「Dockerfile」とします。
1 2 3 4 5 6 7 8 9 10 11 12 13 14 15 16 17 18 19 20 21 22 23 24 25 26 27 28 29 30 31 32 33 34 35 36 37 38 39 40 41 42 |
FROM ubuntu:18.04 ENV PYTHONUNBUFFERED 1 ENV PYTHONIOENCODING utf-8 ENV HOME /root ENV DEPLOY_DIR ${HOME}/mysite RUN apt update # Set locale # https://stackoverflow.com/a/28406007 RUN apt install -y locales RUN sed -i -e "s/# en_US.UTF-8 UTF-8/en_US.UTF-8 UTF-8/" /etc/locale.gen \ && locale-gen ENV LANG en_US.UTF-8 ENV LANGUAGE en_US:en ENV LC_ALL en_US.UTF-8 # Install Python 3.7 RUN apt install -y wget \ build-essential \ zlib1g-dev \ # https://stackoverflow.com/a/43923402 libssl-dev \ # https://stackoverflow.com/a/29862854 libsqlite3-dev WORKDIR ${HOME} RUN wget https://www.python.org/ftp/python/3.7.5/Python-3.7.5.tgz \ && tar zxf Python-3.7.5.tgz \ && cd Python-3.7.5 \ && ./configure --enable-optimizations \ && make altinstall # Set alias RUN update-alternatives --install /usr/local/bin/python3 python3 /usr/local/bin/python3.7 1 RUN update-alternatives --install /usr/local/bin/pip3 pip3 /usr/local/bin/pip3.7 1 RUN pip3 install -U pip WORKDIR ${DEPLOY_DIR} CMD ["/bin/bash"] |
次のコマンドを実行して、DockerfileからDockerイメージを作成します。
|
|
$ docker build -t <イメージ名>:<タグ名> <Dockerfileを配置したディレクトリ> $ docker build -t mysite:1.0 C:¥Users¥user¥PycharmProjects¥mysite |
このDockerfileから、python3.7.5をインストールしたUbuntu 18.04ベースのイメージを作成することができます。
Dockerコンテナ の作成・起動
コンテナ を作成・起動する
Dockerイメージが作成できたら、Dockerコンテナを作成して起動します。
次のように docker run コマンドを実行して、コンテナを作成・起動します。
Dockerコンテナを実行して、bashで対話型シェルにログインします。
runserverのために、8000番ポートを開けておきます。
また、DjangoプロジェクのディレクトリをDocker側の「/root/mysite」ディレクトリと同期させます。
|
|
$ docker run -it -p <オスとOS側のポート番号>:<コンテナ側のポート番号> -v <オスとOS側のディレクトリ>:<マウント先のコンテナ側のディレクトリ> --name <コンテナ名> <イメージ名>:<タグ名> <起動時のコマンド> $ docker run -it -p 8000:8000 -v C:¥Users¥user¥PycharmProjects¥mysite:/root/mysite --name mysite mysite:1.0 /bin/bash |
Dockerコンテナ上で事前準備
「393dff996336」は、Dockerコンテナ作成時に自動的に作成される「コンテナID」です。
|
|
## 必要なパッケージを適宜インストール root@393dff996336:~/mysite# pip install Django==2.1 ## requirements.txtでまとめてインストール root@393dff996336:~/mysite# pip install -r requirements.txt ## MySQLインストール root@393dff996336:~/mysite# apt-get install mysql-server mysql-client |
動作確認
これで、PyCharmで作成したソースコードを、Dockerコンテナ上のUbuntuで動作確認することができます。
ホスト側の環境を壊すこともありません。
最後にrunserverを実行して、Windows上のブラウザで動作確認を行います。
|
|
root@393dff996336:~/mysite# python3 manage.py runserver 0.0.0.0:8000 |
Dockerコンテナ(コンテナID:393dff996336)を起動して、ログイン。
MySQLサービスを起動して、作成したユーザでMySQLに接続して、「quit」コマンドで抜ける。
次に、「python3 manage.py runserver 0.0.0.0:8000」で、サーバーを起動する。
ブラウザで、「http://localhost:8000/hello」で動作を確認。「hello」は、Djangoのアプリケーション名。
1 2 3 4 5 6 7 8 9 10 11 12 13 14 15 16 17 18 19 20 21 22 23 24 25 26 27 28 29 30 31 32 33 34 35 |
Windows PowerShell Copyright (C) Microsoft Corporation. All rights reserved. PS C:¥Users¥user> docker start 393dff996336 393dff996336 PS C:¥Users¥user> docker attach 393dff996336 root@393dff996336:~/mysite# service mysql start * Starting MySQL database server mysqld No directory, logging in with HOME=/ [ OK ] root@393dff996336:~/mysite# mysql -u root -p Enter password: Welcome to the MySQL monitor. Commands end with ; or \g. Your MySQL connection id is 4 Server version: 5.7.28-0ubuntu0.18.04.4 (Ubuntu) Copyright (c) 2000, 2019, Oracle and/or its affiliates. All rights reserved. Oracle is a registered trademark of Oracle Corporation and/or its affiliates. Other names may be trademarks of their respective owners. Type 'help;' or '\h' for help. Type '\c' to clear the current input statement. mysql> quit Bye root@393dff996336:~/mysite# python3 manage.py runserver 0.0.0.0:8000 Performing system checks... February 13, 2020 - 12:20:21 Django version 2.1, using settings 'config.settings' Starting development server at http://0.0.0.0:8000/ Quit the server with CONTROL-C. |


